A Few Announcements

By Terri

Have a photo of the Tuileries Gardens. You deserve it.

Well, it’s been a year, hasn’t it?

We haven’t released any new products this year, but we did manage to bring a nice selection of prints, stickers and originals to the Chicon 8 art show. We even sold the original Lady Astronaut painting! And we do appreciate those of you who have been steadily making online purchases. It’s kept a nice stream of income coming our way, which is nothing to sneeze at.

Which brings us to the first announcement - while our shipping prices have remained stable over the last several years, the actual cost of postage and supplies have gone up sharply. Inflation, it’s a thing! So in the coming year, we’ll be raising our shipping prices. Stickers ordered on their own will still be shipped for free, untracked. Everything else will see a price hike for shipping.

Speaking of shipping, the second announcement. Ariela will be moving house in the next couple of weeks. That means the bulk of our extant stock, not to mention the supplies to make new stock, will all be in boxes. Terri keeps some stock in Seattle, but not enough for most orders. We will be suspending order fulfillment until February 1. You’ll still be able to make purchases, but we won’t be shipping them out until 2/1/23. This gives Ariela enough time to unpack everything in her brand new studio. Think of this shipping hiatus as the ability to give a present to your future self.

As for the third announcement, it concerns awards eligibility. Neither of us are eligible for a Hugo nomination this year. To be honest, this is somewhat of a relief. The 2023 Worldcon is controversial at best, and don’t get Terri started from a SMOF perspective on it.

2022 has been one hecking chonk of a year, and we look forward to some new projects upcoming in 2023!

Calligraphing Out Loud

by Ariela

I don’t talk much about my day job over here. 35 hours a week I work on the technical back-end of email marketing and on website analytics for the Union for Reform Judaism (I’m not Reform, I just work for the institution, in case that wasn’t clear.) I take inspiration for my tech-related calligraphy projects from it, but otherwise I assume that no one is coming to the Geek Calligraphy blog to hear me blather about non-profit marketing or database integration woes. But this time I am going to talk about my day job, because I am doing something over there that has surprising applications to calligraphy.

For the past few months I have been doing a professional development program called Working Out Loud. I started it because lately I have had trouble focusing on long term projects and have found myself instead reading news coverage of the dumpster fire that is the world instead. Not that staying informed is bad, but this wasn’t healthy news consumption, and it wasn’t resulting in much action on my part; I just read and read and felt nauseated and distressed. I wanted help getting my focus back. I was initially reluctant to give it a try – I am deeply skeptical about corporate professional development programs – but a coworker whom I trusted vouched for it, so I signed up.

The five elements of Working Out Loud are relationships, generosity, visible work, purposeful discovery, and a growth mindest.

I was surprised to find myself far more inclined to apply the lessons from the program to my calligraphy work than to my day job, and not in the ways that might be expected. Yes, Geek Calligraphy is a small business and a “startup,” but instead of causing me to get more business-y about it, it wound up encouraging me to go the opposite way, particularly on Twitter, in two significant ways.

First, I decided to share more of my responses to things I am reading on Twitter. Mostly that takes the form of telling authors when I am reading and enjoying their book. I didn’t do that much before because I figured that authors get enough noise at them on Twitter, they didn’t need one more person up in their mentions. But the Working Out Loud exercises on “the gift of attention” inspired me to start. Most of those posts have gotten likes from the authors, so I guess they don’t find it annoying after all 😊 In one case I even took a selfie (I never think to take selfies, and when I do I am terrible at them) to show exactly how gobsmacked and touched I was by a certain passage in a book that resonated with me very deeply.

Second, I decided to make more of an effort to share process shots on social media. As a perfectionist, I find the idea of sharing images of my work in progress scary. How can I let people see anything less than my best finished product? But the exercises in being vulnerable, and above all the encouragement to work in a visible way while in community with other people, i.e. “working out loud,” encouraged me to give it a try. In September I shared process shots of a piece on Twitter as I was working on it, and I was surprised at the positive responses I got. Given how much I enjoy watching work-in-progress videos from my favorite artists online, I suppose I shouldn’t have been so shocked, but it never occurred to me that others would view my work the way that I look at theirs.

We just did Week 8 (of 12), and it contains a Habit Checklist. My circle leader, Larry Glickman, suggested printing it out but, ha, I wasn’t just going to print it out! I don’t do boring printouts on my walls, I do calligraphy. And, in the spirit of the Working Out Loud ethos, I want to make it available to anyone who will find it helpful for their personal use.

WorkingOutLoudHabitChecklist_watermark.png

Download a printable PDF of the calligraphy. Feel free to print it out for your own use. It’s black and white for maximum friendliness to workplace printers. (No commercial reproduction, please.)

Would I recommend Working Out Loud to other people?

Yes, but with two caveats.

First caveat is that the program assumes that participants have a certain safety margin in their personal circumstances. I mean that in a financial sense, in a physical safety sense, and in an emotional labor sense. On the financial side, the program doesn’t require a significant outlay of money, but it does require time, and of course, time is money. In terms of physical safety, Working Out Loud encourages public vulnerability, which can be dangerous for people of marginalized identities, both in the physical world and online. For survivors of abuse or violence, it can be a panic-inducing prospect. WOL does emphasize that each exercise is always up to you and you should never do anything that doesn’t work for you, but the repeated calls for voluntary vulnerability could be very off-putting for those for whom vulnerability is not optional. In terms of emotional labor, the program encourages participants to be generous with their time and their expertise, which is lovely, but very hard to do when the world already expects you to work for free. Of course it is different to choose freely to give of yourself, but for some people and in some professions that needs to be preceded by a cost-benefit analysis of “will doing this for free once cause an expectation of free labor ever after?” Again, WOL doesn’t demand that you do any exercise that doesn’t work for you. But these are some things it is helpful to be aware of so that you can choose whether Working Out Loud will be a good program for you.

The second caveat is that I haven’t found any awareness in the course that, for some, the program will run up hard against structural inequalities. If your main resource is your network and your community is struggling deeply, they will have fewer resources to help you get ahead. Study after study shows that unconscious bias is alive and well, to say nothing of conscious prejudice, and it will make expanding a network and demonstrating work much harder for some people than for others. Expecting a self-improvement program to overcome systemic inequalities would be totally unrealistic, not to mention unfair. But awareness of the limitations in the face of such problems is crucial.

I do still recommend Working Out Loud. I am even making plans to start my own circle with some friends in the geeky professional community after I finish my first circle.

Get Your Own Terri

by Ariela

Basically since day one of Geek Calligraphy, I have been telling friends how grateful I am to have Terri as my partner, because without the things she does, this would be a much more difficult undertaking. I have also been telling my professional creative friends forever that they should get a Terri of their own. Well, now you can!

Chibi Terri holds a sign saying "Will Wrangle on a Contract Basis."

Chibi Terri holds a sign saying "Will Wrangle on a Contract Basis."

Terri is now taking on wranglees on a contract basis.

What can Terri do for you?

  • Invoicing – Do you forget to invoice your clients on a timely basis because you are so caught up in the creative work of your project? Terri can send your invoices to your clients, or remind you to do it.
  • Yelling at people – Are your clients late in paying their invoices? Did someone use your art without permission but the prospect of sending a DMCA takedown notice makes you want to hide under a blanket? Has your confidence in your prices deserted you, leading you to work below market price? Terri can speak sternly to people on your behalf and enforce your professional boundaries.
  • Unsticking – Do you have a magnificent new project that you cannot wait to start but you are unsure where to begin? Does the magnitude of stuff that you need to get done paralyze you to the point you cannot do any of it? Terri can be a source of outside accountability to keep you on track. She can also help you break things into manageable bites and figure out which ones to start with.
  • Social Media - If you need social media for Professional Business-y Reasons but it is overwhelming and stealing brain from your creative work, Terri can help.
  • Work with you for short or long periods of time – If you need help with one specific thing, Terri can work with you for that long. If you need ongoing help, she can do that, too.
  • Other things - This is not an all-inclusive list. If you need help with something not on here, ask her!

What Terri will not do for you:

  • Be your business or creative partner – She’s mine, I found her first!
  • Work below market rate – Terri is providing an important service and will be compensated accordingly. It would be hypocritical for her to offer to help you get paid what you’re worth, then accept less for her.
  • Work without a contract – Contracts are there for the protection of both parties. Even a short engagement needs a contract.

While Terri's personal website is ArtistWrangling.com, and artists are her specialty, she does work with non-artist clients.

What are you waiting for? Get your own Terri!

Calligraphy Tools: Beyond Pens

by Ariela

This is a followup to the post of several weeks ago about different types of calligraphy pens. While pens are, in many ways, the most important tool of the trade, it would be a lot harder to get good results without others.

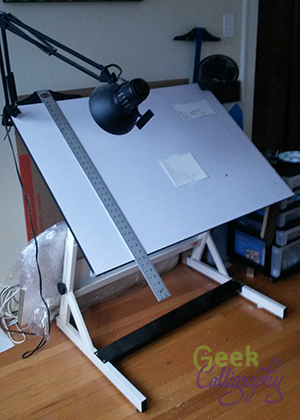
Ariela's drafting table with t-square hanging off it.

Ariela's drafting table with t-square hanging off it.

Drafting Table

You won’t get far without a good surface to write on. The sloped surface of a drafting table considerably reduces strain. When working on large surfaces, I increase the angle to bring the top closer to myself. Even when working on smaller pieces, the slant means that the pen meets the paper or parchment at a different angle than it would on a flat surface.

Mine is a Bieffe AF15, but brand matters much less than height and range of angles. As long as one adjusts to heights and angles that are comfortable for you, that's all that matters.

Good lighting is important while working. Many artists, myself included, answer this need by installing a swingarm lamp on one corner of their drafting table, but there are plenty of other solutions available.

T-Square

Making straight, parallel lines is one of the most important preparatory steps for calligraphy. Some drafting tables have a ruling tool built in. Mine doesn’t and I like it that way; there are times when I want to be able to use the entire surface of the table. Instead, I use a t-square together with the flat edge of the table to rule parallel lines. Mine is three feet long.

Ariela rests a triangle on her t-square.

Ariela rests a triangle on her t-square.

Triangle

When making vertical lines, it isn’t always practical to flip the t-square and use it vertically; for one thing, the t-square is quite a bit longer than the table is tall, and jabbing myself in the gut is not fun. When I need to make a small to medium vertical line, I rest a triangle on top of my t-square.

Lettering Guide

Ariela rests a lettering guide on a t-square.

Ariela rests a lettering guide on a t-square.

This little gizmo saves me so much time. Instead of measuring along the side of my writing area and marking each point at which I should draw a parallel line, I sit it on top of my t-square and it does all the spacing for me. (This is another way the slant of the drafting table helps – I can use gravity to keep the bottom of the lettering guide flush with the t-square.) I can change the line height by rotating the disc in the center between 3mm height and 10 mm height. If I want to work bigger than that, I can skip holes in the center or use the ones along the sides.

If you are a calligrapher and you don't have one of these, I highly recommend acquiring one. They are cheapest from Blick Art.

Lead Holder/Lead

Hand holding lead holder.

Hand holding lead holder.

This is the original mechanical pencil. While you can now get leads of different weights to load into modern mechanical pencils, I prefer this one for a few reasons. You do sharpen this lead, unlike your standard mechanical pencil. This means that you can choose how much you sharpen it; if a super sharp lead tends to cause you to gouge holes in your paper, you can keep it a little bit dull. The lead is thicker than the 5mm or 7mm standard to mechanical pencils now, so I don’t snap it as easily when inserting it into the holes of the lettering guide. I also just like the feel of this pencil body, the weight and the balance. Others might prefer different pencil bodies. I tend to use a 2H lead, which provides a good balance between producing a line that is dark enough to see but doesn’t lay down enough lead to smudge much while working.

Guard Sheet

I put a piece of paper under my hand to prevent the oils from my hand from touching the paper too much as I rest my hand while writing. It can be any scrap piece of paper.

There are more tools still for when I need to do fancy schmancy things, but these are the ones that get used in basically every calligraphy project

Questions?

I love talking about the technical aspects of calligraphy. The best way to get in touch is to tweet @GeekCalligraphy.

Fun with Quill Grips Part III

by Ariela

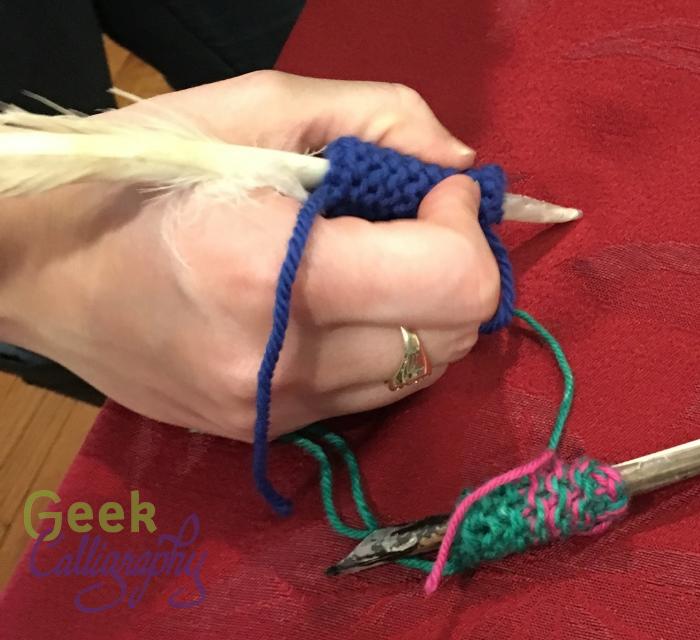
Quill grips knitted by Terri

Quill grips knitted by Terri

Back in May I wrote about the discomfort I was experiencing as I started to write with a quill due to the shaft being narrower than was comfortable for me to grip. Terri knitted two quill grips for me to use, proving that she is a wonderful manager and best friend and sometimes just as inclined as I am to do weird stuff just because the idea is there.

Alas, I discovered I have a tendency to get ink on them. And when you get ink on yarn you are gripping firmly, it comes back out. Sometimes I just got it on my fingers, sometimes it dripped, and sometimes it gooshed out in truly unfortunate ways. No photographic evidence of this part exists, because whenever it happened I was occupied with grabbing for blotting rags rather than reaching for a camera. I refuse to attempt to recreate it for the interwebs - I have some dignity to maintain.

So I turned back to the Rainbow Loom grip that I made. It is significantly less comfy than Terri's knitted ones, but rubber bands have zero absorbance, so I just wiped it off whenever I got ink on it. It did not get quite as sweaty as I had feared it would, but the knobbiness got to be a problem if I wrote for more than an hour.

Around the same time that I was inspired to upgrade my nib organization, I was similarly inspired to look into solving the persistent irritant of my quill grip. I knew that what I really wanted was molding rubber, but that I also didn't want to deal with making a mold. Fortunately for me, other people have also had a similar desire, and some time spent googling around introduced me to Sugru.

I ordered some Sugru and after a number of delays I finally got it. Based on all the images and gifs I have seen of people putting it on wires and showing how bendy it is I assumed it would have a decent amount of squish to it after it cured. Between the formulation of that sentence and the photos of people using it to hang pots on the wall, you have probably guessed that this did not turn out to be the case. Yet somehow I failed to reason that out. So I wrapped the entire packet around it in an effort to increase the girth of the quill as much as possible to counteract the assumed squish. Turns out, Sugru is only bendy when small amounts are wrapped around other things that are bendy. When you wrap a chunk around something that doesn't have a heck of a lot of give to it, it's pretty solid.

The new quill grip made out of black Sugru. I chose black so that it won't show any staining from the ink.

The new quill grip made out of black Sugru. I chose black so that it won't show any staining from the ink.

I've been busy with other projects since I did this, so I haven't had a chance to test out the new grip for an extended period, which is always the proving ground. I may trim it down, or I may use another packet to make a narrower grip, perhaps with a bit more contouring, though I have never been a fan of those super-contoured pencil grips they make. But I think that Sugru is probably the solution I have been looking for.

Upgrading Nib Organization

by Ariela

When I feel like I cannot control what is going on in my life, one of my coping mechanisms is to clean and organize. Clutter makes me tense, and it acts as a good proxy for things I cannot actually control. Last year, during a particularly bad couple of weeks at work, I labeled every ten-inch span of the shelves in my pantry.

A few weeks ago, inspired by I am not sure what, I decided that I needed to upgrade my nib organization system. I mean, I know why I needed to improve the situation, I'm just not sure what prompted me to decide that now was the time that it needed to be fixed.

 This was my old organization system:

One box with slots, seven little envelopes, three little plastic bags, and one box labeled "random nibs" with utter chaos inside.

One box with slots, seven little envelopes, three little plastic bags, and one box labeled "random nibs" with utter chaos inside.

The plastic case with the different slots for 10 nibs, a piece of magnet, and reservoirs, was originally a set of Manuscript nibs that I bought years ago in a state of naivete. (I have since learned that I hate Manuscript everything, from their nibs to their cartridge pens.) I moved the Manuscript nibs somewhere else and put my primary set of nibs, right-handed Mitchell Roundhand nibs from John Neal Booksellers, in there. It's not space efficient, but it meant that I could find the correct size nib easily.

Not so for the rest of my nibs. My left-hand Mitchell nib set, used for certain Hebrew hands that require a different pen angle, I continued to keep in the little envelope John Neal sent it in. Every time I wanted a nib, I had to dump out the entire set and sort through them to find the right size. Ditto my backup sets of nibs for both right and left Mitchell nibs. All my other nibs were jumbled together in a small box held closed with a rubber band.

I thought about trying to get more cases like the one my Manuscript nibs came in, but it's not particularly space efficient.

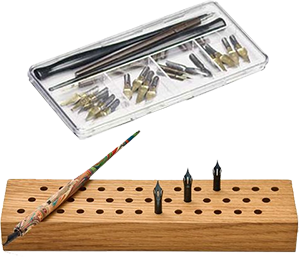
The two nib organizers that don't meet my needs.

The two nib organizers that don't meet my needs.

So I googled for "pen nib organizer." I came up with surprisingly little. Artbin has a container similar to the Manuscript one, but it has several compartments in which to put multiple nibs, which would still require a bunch of sifting through a bunch of nibs to find the right one. There was also an Etsy listing for a block of wood that would store the nibs pointing upright, perfect for stabbing yourself when trying to get the next nib over. But the second image result led me to this blog post from Studio Chavelli.

So over the following weekend, I made my own. I continue to be terrible about taking process photos, but here is my finished Nib Organizer Wallet:

Head-on view of the new nib organizer wallet, with my hand

Head-on view of the new nib organizer wallet, with my hand

Side view of the open nib organizer wallet

Side view of the open nib organizer wallet

The first two rows or "pages" of nibs are both Mitchell Roundhands, righty nibs in front with the yellow paper, lefty second with the purple paper. The two remaining rows behind are both covered in white paper and contain my Brause poster nibs, a selection of Hunts, aka Speedball, and two random singletons with space for more at the back. Each is labeled, but the color and order tells me at a glance what is where.

The inside of the organizer is all corrugated cardboard, but I wanted the outside to be more durable. I used a different kind of cardboard that is much denser but also thinner and taped both a front and a back on just like extra pages. I added two additional pieces to create a top flap that lapped the front over. I covered it with some tan pleather I had lying around, gluing it in place with PVA glue. Then I cut a small notch in the front of the outside cover so that I could settle the socket half of a large snap in place. I then sewed the snap down with doubled button thread. I used a piece of durable blue fabric leftover from a bookbinding project to cover the inside of the front cover; cut it to size, pinked the edges, and then glued it into place with PVA. The blue cloth covered up the edges of the pleather and the ugly side of the stitches on the snap socket.

I cut a piece of the same blue cloth to cover the inside of the back cover next. I sewed the stud half of the snap to that fabric before pinking the edges and gluing it into place to keep from having to sew through the cardboard and leave the stitches showing on the other side of the pleather. I glued the pinked fabric with the snap sewn in to the inside of the back cover with PVA. And that was it.

I brought the new nib wallet with me to Capricon where I was doing some art demos. I could tell when a fellow dip-pen user walked by because they would stop and goggle at the open nib wallet next to me. I got nearly as many exclamations over the nib wallet as I did over the calligraphy in process. Clearly I am not the only one who has felt the absence of such an item in their life.

More Advice for Artists: On Contracts

Including Sample contracts for Ketubot and Teaching Workshops

by Ariela

In addition to the "Judaism's Influence on SFF" panel, I also sat on a panel on "Consulting & Contracting: How To Make (For) Money." We covered a lot of practical advice, ranging from answering specific questions from the audience to general advice (Find a nice person to do your taxes for you, they are worth every penny!).

This is what a sample of the first page of Ariela's boilerplate contract looks like.

This is what a sample of the first page of Ariela's boilerplate contract looks like.

One of the "brass tacks" sections that I insisted we cover was the basic parts of a contract. For me, they are:

  • Deliverables - make sure everyone understands what is being promised and what is not within the scope of the project.
  • Timeline, Breakdown, and Deadlines - make sure everyone knows what has to happen first and that deadlines work both ways; you cannot deliver the product on time if you don't get the necessary answers and pieces on time.
  • Copyrights, etc. - lay out who holds the rights to what once the project is done.
  • Payment - set the payment schedule and the projected cost, with a caveat that changes to the scope of the project along the way will change the price, probably increasing; include late fees if possible.
  • Provision for changes - lay out the process by which a party can request changes to the deliverables or contract, plus cost renegotiation.
  • Escape Clause - how can the contract be canceled?

We also talked about finding contract templates online. There are lots of them available. The Graphic Artists' Guild has some good examples. However, I mentioned that since my commission work - ketubot (Jewish marriage documents) - is so niche, none of the samples I found really covered the particulars I needed. At which point the other panelists turned to me and asked "Have you put a sample online for other artists?" And I went, "Oh, yeah, that would be a good thing to do."

So here: Sample Contract for Ketubah Art and Calligraphy

Please feel free to download it and alter it to suit your needs. It is not watermarked and does not have the Geek Calligraphy logo on it, and you should feel free to remove the attribution at the end when you adapt it for yourself. I want this to be as widely available as possible.

You may notice that it is long. Many sample art contracts are just one page. This one covers a lot of specifics to the ketubah trade, and there are many fiddly details to be worked out when the contract is to produce another contract.

While I am at it, I also want to make available my other mainstay contract, the one for teaching engagements. I mostly teach in my safrut (Jewish ritual scribing) hat, but I am available for teaching regular Hebrew or English calligraphy as well. And I won't teach without a contract.

Sample Contract for Teaching Engagement

This one is a lot more generic, and there are plenty of other sample contracts for teaching isolated gigs out there. Find one that covers your particulars.

Some Words of Warning

Now remember kids! Don't ever work without a contract unless you are willing to be stiffed completely for the project.

Unfortunately, even having a contract is not a guarantee of getting paid. Sometimes just getting a lawyer to write a threatening letter on official stationery is enough to inspire a client to pay. But then there are times you have to make a decision about whether it is worth contacting a collections agency or taking the client to small claims court to get paid or just needing to eat the loss. But if you don't have a contract, the chances of not getting paid are much, much higher. I know this from experience. And if anyone balks at signing a contract run away fast.

This goes just as much for work you do for friends and family as it does for work you do for strangers. Many friends are lovely and respectful about it, but others turn out to be nightmare clients. Spend some time on Clients from Hell and you will see complaints about people whom you thought were close to you expecting hours of free labor by dint of relationship. Your work is valuable and people do not have a right to impose on you just because they are friends or family.

While we're talking about the worth of your work, a topic on which I have expressed strong feelings in the past, let's talk for a moment about pricing. I won't go into specifics because I can't even begin to create a price chart for my own work, nevermind for someone else's, given the number of potential variables. But don't think that just because you are new to professional art-ing that you shouldn't get paid. Particularly please do not think that you are doing other, more experienced artists a disservice by charging. When you charge too little, you a) set up expectation that your prices will be too low in the future, and b) you cut the market out from underneath everyone. So for the love of whatever higher power you embrace, please charge what your time is worth and get a contract signed.